

In our last post, we covered the first part of this three-part series by diving into the foundations of user testing and prototyping. We explored core concepts such as why and when we test with users, where user testing falls in the design process, prototyping types, fidelity, testing, and all things prototyping tools. Make sure to check that out if you missed it!
Today, in part two of this blog series, we write about all things usability testing.
By performing usability tests, we gain insight into how users interact with a product or service, allowing us to make critical changes to improve the user experience before launching. Failing to test with users means missing out on a huge opportunity to better serve your users and customers!
In this blog post, we’ll cover…
-
Things to consider when conducting usability testing,
-
Moderated vs. Unmoderated participant interaction,
-
Remote testing and our favourite tools,
-
Consent and test protocol.
What is Usability Testing?
Usability testing tests the effectiveness, functionality, and overall user experience of a product or service. Usability testing typically occurs before the final version of an application is launched. Research participants provide feedback to fix ease-of-use issues and design flaws. During usability tests, designers and researchers observe real users as they attempt to navigate a desktop, mobile, tablet, or web application.
Important Considerations for Usability Testing
There are a few critical things to consider while conducting usability tests…
Context of Use
Context of use refers to the situation, environment, or place where users typically engage with your product or service. You should always consider the context of use when designing and deciding the primary platform or device for testing. Ask yourself… Where is your user when they are using your application? Are they on the go trying to catch a bus or at work sitting at a computer? What is going on around them? Are there distractions? Are they able to focus on complex tasks? For example, when considering an application like Canva (a graphic design tool), users are likely to focus on and access the web application on a desktop/laptop screen. In comparison, someone accessing a bus schedule online might be travelling while using a mobile device.
Device Type
Alongside the context of use, you’ll want to consider what device your primary audience uses when they access your application. We recommend you follow the 80/20 rule! This means that you aim to design an ideal experience for 80% of use cases (AKA those that happen almost all of the time) and de-prioritize the other 20% of use cases (the ones that occur less frequently). So if desktop traffic is about 80% more than mobile traffic, a mobile-first approach is not the way to go. Test on the device/platform used by the majority of your users and use google analytics to find out where your users are hanging out. You can also run separate usability tests for desktop and mobile users (Android and iOS).
The 80/20 Rule on Outwitly’s Instagram
View this post on Instagram
Test Environment
Will you run your tests remotely using a web-conferencing tool like Zoom or Lookback.io? Or will you run your test in a more formal setting, in person? We’re willing to bet it’s the former given the pandemic, but nonetheless, let’s break down the two different test environments you might consider.
Remote Usability Testing is easy to set up. Most participants will have access to wifi and the tech required to run a remote usability test. The numerous advantages of remote testing are freedom of location (you can recruit users from across the globe!), flexibility for scheduling, and a less intimidating experience for your participants. Conversely, remote testing can lead to more no-shows. It can also be difficult to see facial reactions and body language, making it harder to know when to probe or ask questions. Remote testing is also not always inclusive for less tech-savvy, able participants or those who may not have access to the technology.
Lab Testing occurs in a controlled environment, typically involving an in-person moderator, a two-way mirror, and the research participant, as well as a note-taker. The advantage of an in-person lab test is that it’s very easy to see participants’ facial and body reactions, making it easier to know when to come in with probing questions. Here participants can use the technology provided to them and don’t have to use their own. Lab testing can also bring limitations and be more difficult to set up.
Remote Testing
Image Credit: https://webdesign.tutsplus.com/articles/how-to-conduct-remote-usability-testing–cms-26977
Lab Testing
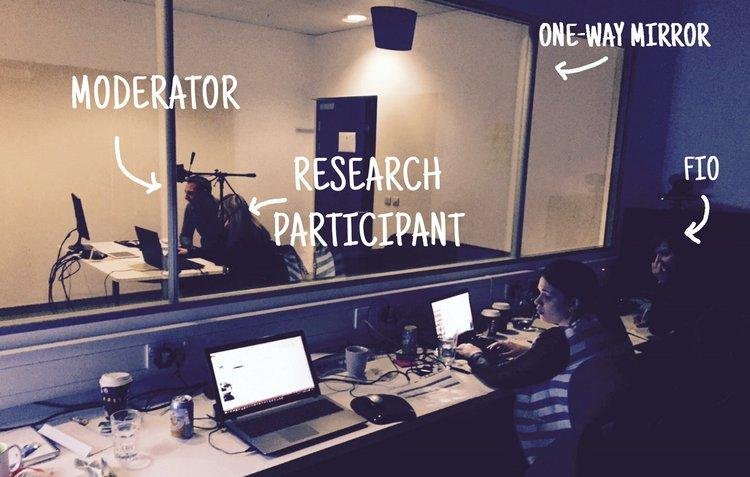
Image Credit: https://www.hotjar.com/blog/website-usability-testing/
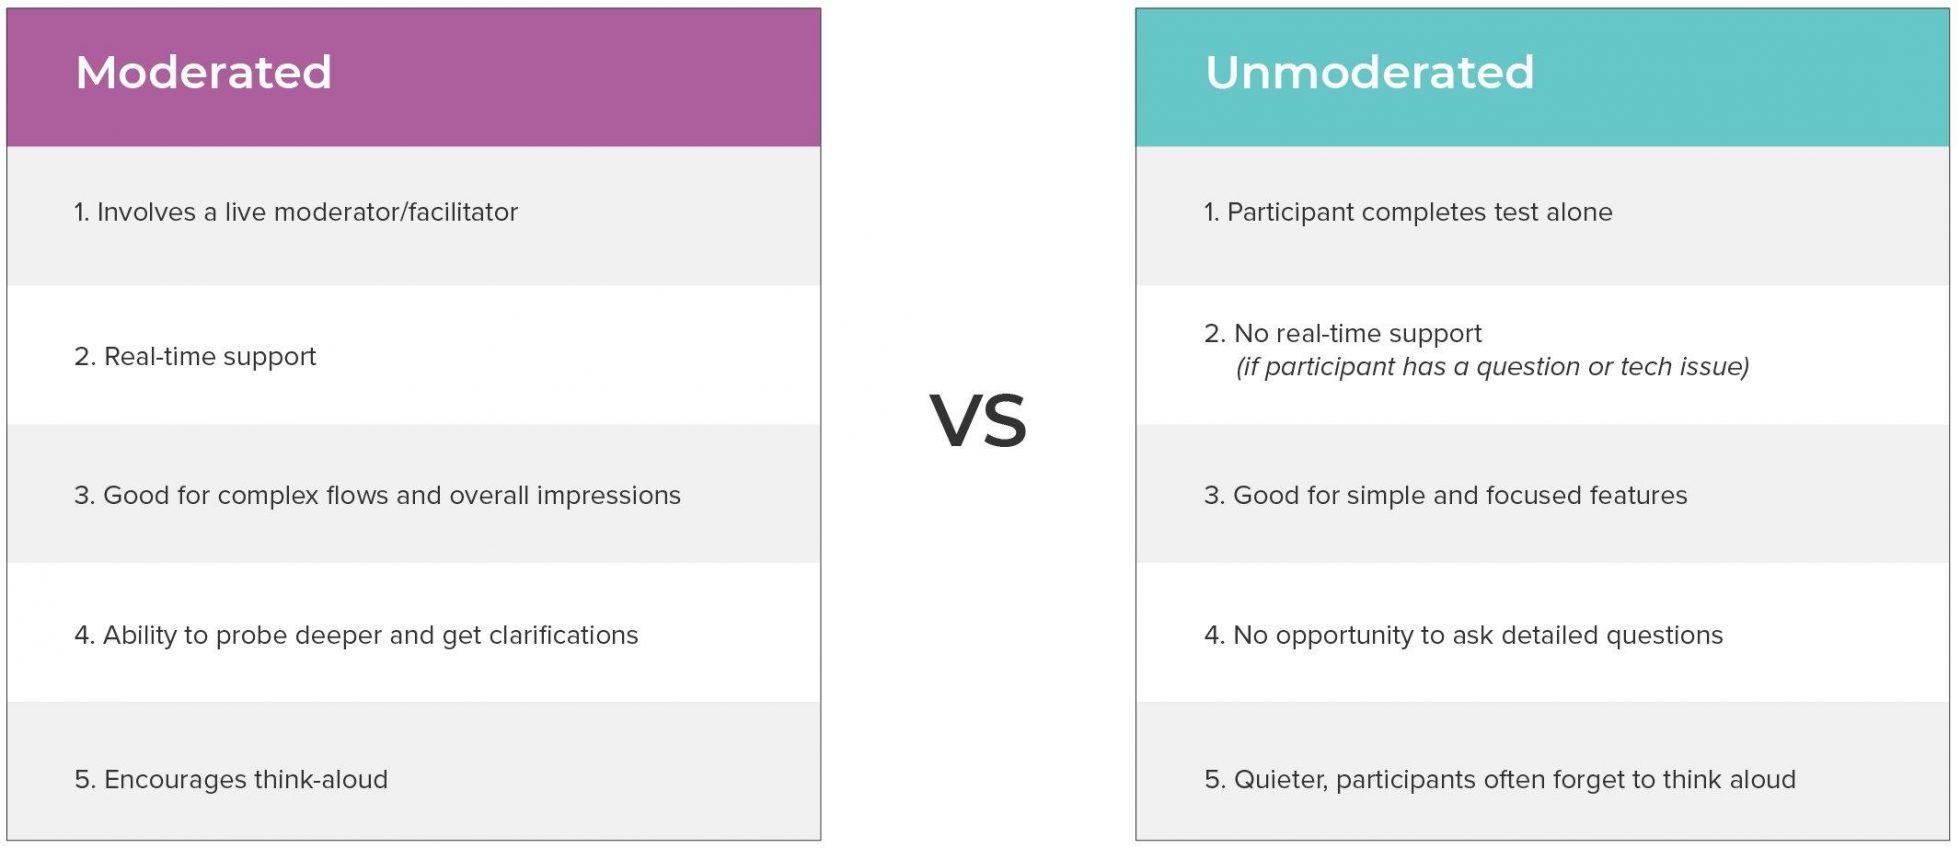
Participant Interaction – Moderated vs. Unmoderated
Moderated Studies
During moderated remote testing, both the user and facilitator will occupy the same space, virtually. As the usability test is being conducted, the facilitator will watch and communicate with the user navigating the test. The facilitator can guide the usability test by asking the user questions to clarify ambiguities or dive deeper into specific tasks. We recommend communicating via online chat, email, or even by phone, to lessen confusion around the test and better support the participant.
One of the challenges presented by moderated testing is knowing when to ask the participant questions. The key is to find a middle ground between listening to your user and interjecting to help them. If your user is keeping quiet, it could indicate they are deep in the task at hand, feeling confused or distracted, or trying to understand what the next step to take is. Use your best judgement!
Unmoderated Studies
Unmoderated remote testing is exactly how it sounds – the user carries out the study solo and without the facilitator’s moderation. When participants sign up for an unmoderated study, they don’t have to be slotted into a schedule. Instead, the user can operate on their own time! Unmoderated sessions are recorded and reviewed later by the facilitator.
During an unmoderated study, you won’t have the opportunity to ask questions in real-time. We’d recommend you insert follow-up questions for the participant after completing each task or when the test concludes. Even though you won’t interact with your user instantaneously, follow-up questions permit additional insight into how their experience was.
In an unmoderated test, users won’t have access to facilitator support if they are disoriented or experiencing technological difficulties. This is where we would suggest the facilitator provide users with their contact information, just in case a situation occurs that impedes their ability to carry out the test! Without the ability to reach out for support, you’ll have no idea if your user ran into an issue or could not complete a task. Unfortunately, unmoderated testing can sometimes lead to unusable or broken usability testing sessions.
When a participant is working through an unmoderated test, you risk the chance of radio silence on their end. Verbal insight into the user’s experience throughout the test is a massive opportunity! An excellent solution to this is the think-aloud protocol. During the usability test, ask your participant to talk you through the steps they’re taking and the thoughts that are arising. You’ll get much more out of the session by being able to hear what’s going through your participant’s mind rather than having to guess.
So, in which cases should you choose an unmoderated study over a moderated one? Unmoderated is an excellent choice when the study intends to gain feedback on only a couple more minor elements. If you’re looking to evaluate an entire product or service, stick to a moderated study.
Check out the diagram below for a full comparison of Moderated vs. Unmoderated studies:
Tools for Remote Testing
Remote testing has its own distinct set of hurdles! Make sure to lean on a solid combination of remote testing tools to enhance and improve your usability tests. These are some of our favourite tools to employ during usability testing:
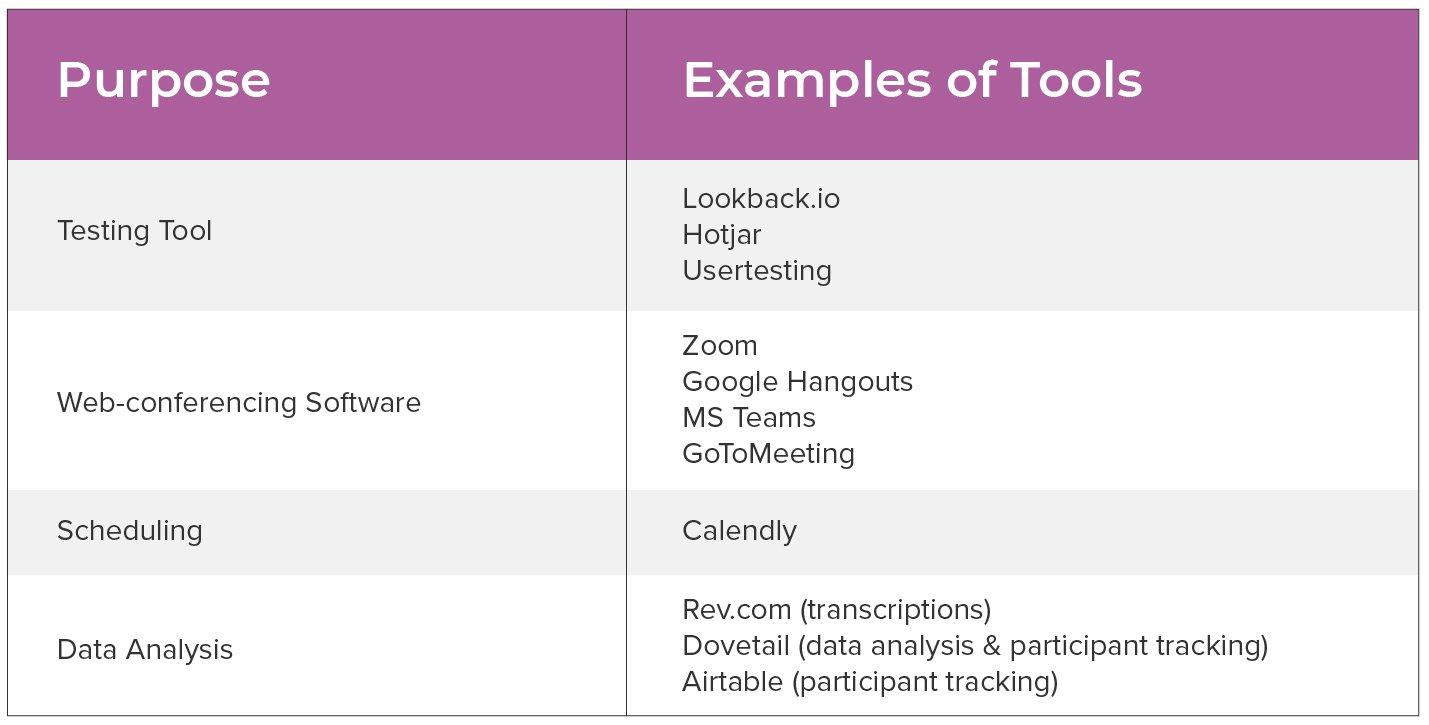
Lookback.io, Hotjar, Usertesting, Zoom, Google Hangouts, MS Teams, GoToMeeting, Calendly, Rev.com (transcriptions), Dovetail (data analysis & participant tracking), Airtable (participant tracking)
Process for Usability Testing
Our process for usability testing can be broken down into 8 steps. Once you update or refine your design based on the feedback you received during the test, the process can restart.

Recruiting
“Testing with just 5 users can uncover 85% of usability problems.” – Neilson Norman Group
We’ll dive more deeply into participant recruiting in a later post, but in general, for usability testing – as the quote says, we recommend you aim to test with 5 to 8 users. You’ll uncover most issues after talking to only five participants, going much beyond this may not be a useful investment of time or resources.
Developing a Test Protocol or Usability Testing Script
A usability test protocol, script, or guide, is a document that outlines the specific tasks you’ll ask participants to accomplish and any probing questions you want to ask them during the test! Protocols are vital because they ensure consistency in your data collection and help the moderator stay focused.
Protocols include five main parts:
-
Introduction (which can also include consent)
-
Scenarios (which help to provide the user context before diving into a task)
-
Tasks (usually one page of your protocol is dedicated to one task, or sub-task)
-
Probing questions (you’ll have sample probing questions that you may ask users for each task)
-
Wrap up & conclusion (here you can ask participants their overall impressions and satisfaction, as well as thank them for their time)
1. Introduction
Here you can introduce yourself and the purpose of your research, as well as provide any relevant background information to participants. You can also explain the concept of thinking aloud in the introduction and explain how the test will be run. If you have not previously asked for consent at this point, now is also the time to do that. You should let the participant know where their data will be stored, whether it will be kept confidential and request permission to record their screen/video/audio. We wrote about Data Privacy in a previous post if you want to learn more about how you can minimize the use of personal participant data.
2. Scenarios
Scenarios describe the particular use case and set of tasks in a story-like fashion. They are written from the user’s perspective and help to set the tone for the task ahead. It can be helpful to provide users with a scenario at the beginning of a test or before beginning a new set of tasks to provide context for what they are expected to do. Scenarios put participants in the right mindset to accomplish the task at hand. For example, a scenario for a mobile transit app, might look like: “Imagine that you are on the bus, on your way downtown to get to work for an important meeting. You just missed your transfer and you need to find another route to work.”
3. Tasks
Tasks are the specific actions or units of work a user carries out to accomplish their goal. When creating your protocol you’ll want to identify the main tasks and sub-tasks you would like to observe and test. Each task should be accompanied by a task question.
For example, the task may be “create an account.” The task question would be, “Can you please show me how you would go about creating a new account?”
4. Probing Questions
For each task that you plan to test, in addition to the main task question, you’ll want to include some probing questions. Probing questions are optional, but they can be helpful for moderators to have in their back pocket if a user freezes up, stops thinking aloud during the test, or if you simply want more information on a particular feature.
Some good examples of probing questions are:
-
What are your overall impressions of this page?
-
Is there any other information would you like to see here?
-
What would you expect to happen if you clicked here?
-
Was there anything you found confusing?
5. Wrap Up & Conclusion
At the end of the usability test it’s always a good idea to have a few wrap up questions about their overall impressions of the product, and how they might rate their experience or the ease-of-use for the product on a scale of 1 to 5. It’s also a good opportunity to ask them to bring up any questions they have, and discuss next steps– whether that’s how soon they can expect their gift card, what you plan to do with the data, or future research you might want them involved in.
Conducting a Usability Test
Remind your participants this is a prototype (not the actual application). You can say something like, “most of the links are not working, so as you speak, please use your mouse to highlight the point you’re addressing.” Or, “please remember that this is a prototype, and not all links or buttons will function.” You should also provide participants with necessary context through the use of scenarios (as discussed above). Tell the participant that they are not the ones being tested, rather, the application is being tested – there are no right or wrong answers here.
In many cases, participants move quickly, and it can be tricky to catch the granular details of their experience. Here are some things to do and look out for while conducting usability tests to get the most out of your participants.
-
Take notes, photos, screenshots, or record (with consent!)
-
Ask their thoughts and expectations of each screen. Before moving on quickly, ask your participants what they think of each page, where they would expect to click, what they think would happen when they do, etc. Then, ask them to “go ahead” and click.
-
Notice, how long does it take them to complete a task?
-
Were they able to accomplish the task without intervention from the moderator?
-
If they struggle or ask questions, encourage your participants instead of giving them the answer.
We cannot stress this enough: conducting usability testing is critical to the success of your product or service! The insight you’ll gain into how real users actually use your application will allow you to make design changes early, before it becomes costly and before putting your product or service into the world (phew!)
We hope this post helped to clarify the many moving parts of the usability testing process. Between part one and part two of this series, you should be able to hit the ground running. Best of luck in your testing journey!